

We’ve all seen examples of ineffective PowerPoint presentations before. The speaker doesn’t seem to have practiced with their slides, or they are staring at the screen and reading the slides, or they skip past slides so quickly that you can’t listen and read them at the same time. In all of these cases, the slides become a distraction rather than a benefit to the speaker. Some attorneys opt to give presentations without visuals instead, which can cause the judge or jury to lose focus.
Avoiding these problems requires integration of the spoken words and the images. As he or she speaks, the attorney delivering an opening or closing argument must know what slide comes up next, and what she should say before and with the slide.
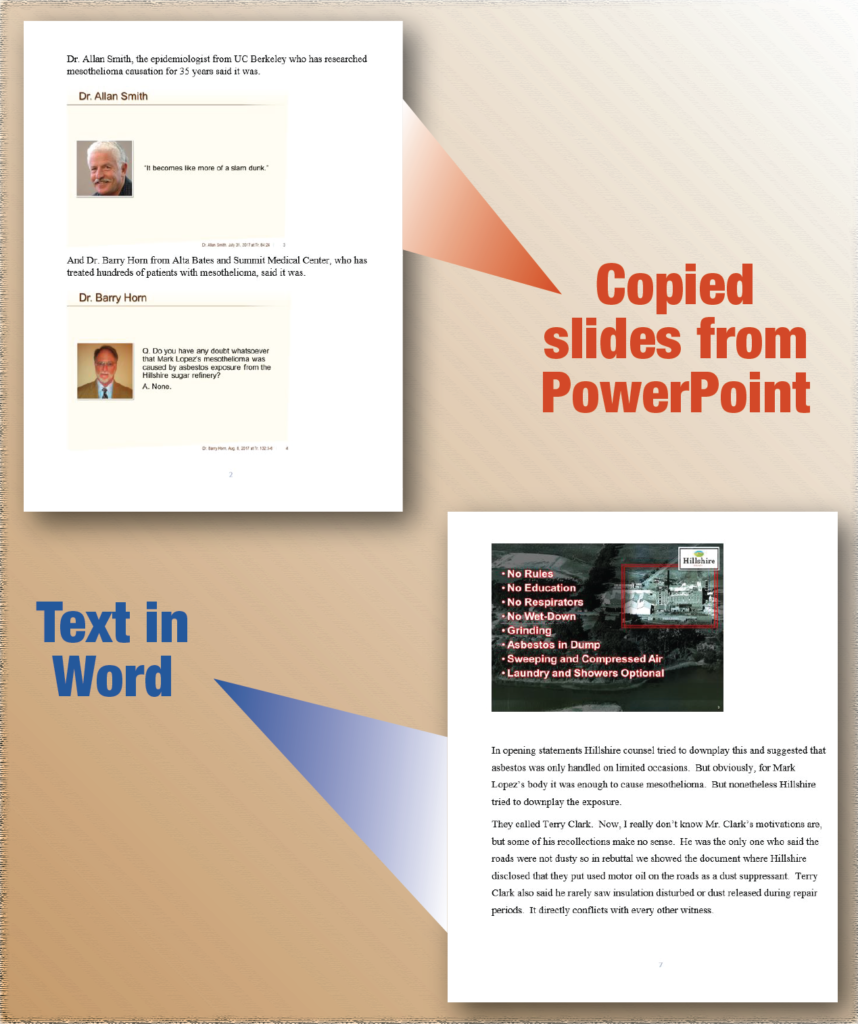
While PowerPoint has an area for entering presenter notes, I often work with attorneys who are more comfortable with a written script. That script becomes more powerful and useful when it includes images of the slides that will be coming up. This enhanced script is what I call a Visual Script.
This post will walk you through how to create and use a Visual Script. Once you have a Visual Script, you’ll never be taken by surprise again when a slide appears.
1. Start with the script
The first step for achieving a great opening or closing is always going to be just taking the leap and getting your ideas down. Begin writing your speech with a Word document, or in longhand, or with a voice dictation system (see my previous post on Dragon Dictation – my preferred dictation software). Starting with slides, while it may seem like a shortcut, can lock you into a certain format or outline too early, causing you to be reluctant to change tack when you should. Another potential pitfall, even more tempting, is to assign creation of initial slides to an associate. The poor associate won’t know where you want to go yet, and heavily editing a slideshow that’s largely irrelevant to your speech can waste a lot of time or lock you into ideas you don’t really like.
2. Bring in the visuals early
Once you have a good start on your speech in Word, prepare your slides or have your designer make them based on your script. Once you have the two separate elements, bringing them together is as easy as copy and paste.
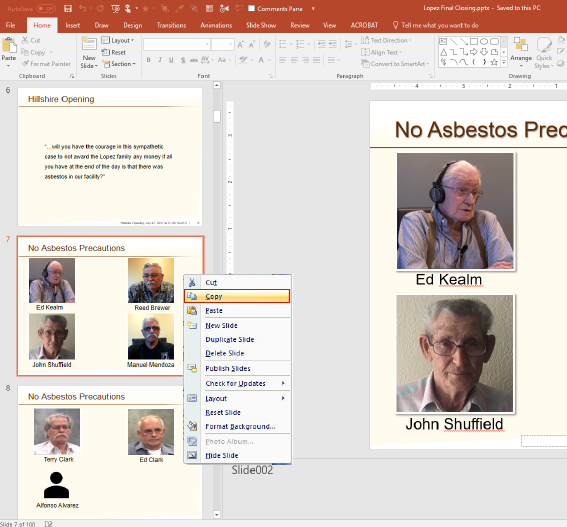
To copy a slide, simply select it in the list on the left side of the PowerPoint window. Use Ctrl+C (Apple+C on a Mac) or right click on the slide and choose “copy.” Navigate then to your Word outline and use Ctrl+V or right-click and “paste” to place the image of the slide at the proper location. You are less likely to affect the layout of your text if you make sure that your cursor is on a fresh new line without any writing when you paste the image. If you have any formatting like bullet points or numbering in that section, use the keyboard shortcut Ctrl+Shift+N to return to “Normal” formatting.
If you’re a pro with Microsoft Word, you can create a small macro to make this process even quicker. The macro I use creates a new line, performs Ctrl+Shift+N, and pastes the copied image all from a single keyboard shortcut that I assigned. For more on how to create and use a macro, see Office Support on the topic.
3. Fine-tuning your script
You can resize the slide image in Word to your preference by selecting the picture and clicking and dragging any corner. If you are experiencing warping of the image, hold down the Shift key while you do this to preserve the aspect ratio.

If you’re still having trouble, right click on the image and mouse over “Wrap Text” to get more options for how your image aligns with your text. It most likely defaults to “In line with text,” but you may prefer another setting.
4. Using your Visual Script
The advantages of using your Visual Script on the day of your opening statement or closing argument are clear. You only need to look one place while you’re speaking, and everything will be familiar since you have practiced from the Visual Script. We recommend that the speaker use a discreet clicker, which will guarantee smooth transitions and put you in charge of every element with ease.
One important item to note when considering whether to use this system is that there is a certain amount of active upkeep required. This does add a few steps to the process of editing slides, but we have found that it’s worthwhile because it makes the presentation much smoother and more integrated. To avoid confusion, name the versions of your slides and outline rather than having one master copy if they are being sent between multiple computers. File names using the date, time of day, and a version number can help make it clear which outline goes with which version of the slide deck.
(Post co-written with designer/trial technician Liz Kelleher)